Tuesday, April 29, 2025

Light Up Astronomical Gnomes


 Oh My Goodness!!!  It is release day at Trinity Stamps and they have my favorite Gnomes out exploring space.  So adventurous.  These friends are from the new Astronomical Gnomes stamp set and coordinating dies.  Of course since they are out in space, I had to do a light up card.  I have a video up on YouTube showing the process and and have included a link at the bottom of this post if you would like to watch me make this card.  

For the background, I cut two strips of white cardstock approximately 2.0" and 2,5" wide.  I used the cloud die from the Scenic Borders: Slimline Series to cut my cloud layers.  I also cut a piece of cardstock to 4.25" x 5.5".  


I inked the cloud edges with Salty Ocean Distress Oxide Ink.  For the actual background I ink blended Tumbled Glass, Salty Ocean, Prize Ribbon, Chipped Sapphire and Black Soot Distress Oxide Inks.

Once I determined where I wanted the button for the lights, I used the "push here" stamp from the Paper Crafting Magic Stamp set to stamp the instructions to the card recipient.  This set also has coordination dies, so I used the stars from the set to cut my gold glitter cardstock.

I temporarily used my gnomes where I wanted them so I would know where I wanted my stars.  Most importantly, the three that would light up.  Once I had my stars placed, I used the end of a ball tipped stylus to poke holes in the stars that would be the one that lighted up.  

I used a strong double sided tape to adhere the button/battery piece on the back of the background.  I placed the lights over the star openings and taped them down.  

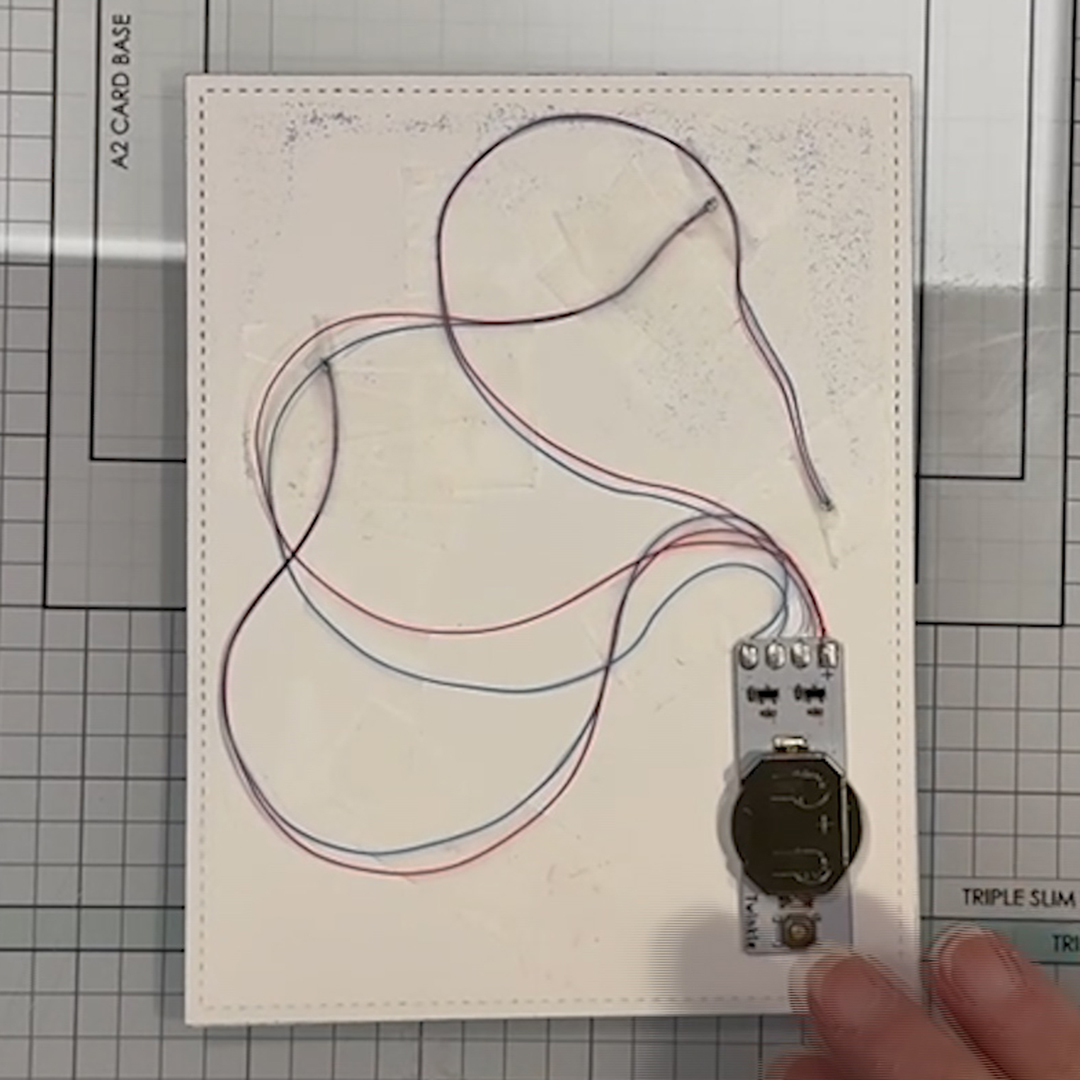
Then I used foam tape on the outside edges and in the center of the card to give it the height needed for the light mechanism.  I adhered that to a piece of cardstock cut to 4.25" x 5.5".

The gnomes are colored with Copic markers in the following colors:  

  • B02, B23, B24, B26
  • V01, V04, V06, V09
  • C0, C2, C4, C6
  • YR65, YR68, R17
  • G03, G09, FBG2, BG05, BG02 - Earth Balloon


Once I had my Astro-Gnomes colored and cut out, I adhered them to the card.  Not that the front of the card is done, I will attach it to a card base.

I am in love with this card and I hope you like it also!


Thank you for stopping by today.  Jump on over to Trinity Stamps and check out the new arrivals.  They are out of this world!


Sandy


Monday, April 28, 2025

Happy Mother's Day!


 Yup!  It's official - this Pull & Slide Surprise Die, is my all time favorite interactive die from Lawn Fawn.  I think I could make one for every stamp collection in my stash!  

I don't usually do Mother's Day cards, but I wanted to use the Whoosh Kite Stamp Collection and coordinating dies and the little momma with her baby on her head just screamed Mother's Day to me.  I know I spent many a Mother's Day doing something fun with my boys when they were little.  

I wanted this card to have very soft colors, so I used patterned paper from the Dandy Day and Spiffy Speckles Collections.


Momma and the kids are from the Whoosh Kites Stamp Set and Coordinating Dies.  I adhered the kite, clouds, butterflies and speech bubbles to acetate to make them fly once the mechanism is activated. They were colored with Copic Markers in the following colors:

R11, R20, R21

YG23, YG25

Y02, Y08

B0000

E40, E41, E42, E43


The sentiment on the inside is a combination of Henry's Build A Sentiment: Bunny Puns and Henry's Build A Sentiment: Winter.  I love the Henry's Build a Sentiment Stamp Sets, you can create tons of sentiments. The little speech bubble above the little mouse's head is from All The Speech Bubbles.  It is the perfect little piece to fill that area because another kite would have been too much.  


The pink scalloped piece is from the Pull & Slide Die Set.  I trimmed down a piece of patterned paper to fil inside and then stamped my sentiment.  The sentiment on the pull tab is from the Whoosh Kite Stamp Set.  Again, it was just perfect for this card.


This turned out so darn cute that now I am going to have to do a Father's Day Card.  Hmmm.....


Thanks for stopping by and I hope you have an amazing day!!!


Sandy


Sunday, April 27, 2025

No One Stacks Up To You!


 Oh dear!  I may have a slight addiction to the new Lawn Fawn Pull & Slide Surprise DieThis is such an easy and fun die to work with.  I just finished one and have another one started on my desk.  I might need an intervention!  Yikes!

I had this card for a gift card holder but inserting cash is just as easy.  I chose a Barnes and Noble Gift card because it worked so well with my little reading buddies.  This will make the perfect birthday card for my daughter in law.  

I used patterned paper for the interactive mechanism because I thought it added a bit of whimsy to the scene.  I mounted the mechanism on cardstock that I had stamped with a few little images from the stamps sets that I used.  I think it is a nice way to add a little extra to a plain cardstock.

I cut a strip of green cardstock using the Grassy Border Die to add a little "ground" to my scene. To add a little more pop to my card, I used some thin acetate strips to have my little birds and clouds pop up when the card is slid open to see the sentiment.  The clouds are cut from white cardstock using the clouds from the Spring Showers Die Set.

My little friends and their  books are from the Little Woodland Library Stamp Set and coordinating die, Little Woodland Library Friends Stamp Set and coordinating dies, and Backyard Bird Feeder and coordinating dies.

All my friends have been colored using Copic markers in the following colors:

  • E40, E41, E42, E43 - Bunny
  • E50, E53, E55, E57 – Hedgehog
  • YR20, YR23, YR24, YR27 - Fox
  • R20, R21
  • C1, C3, C5
  • Y02, Y08, Y19
  • E33, E35, E37
  • YR02, YR07, YR18
  • R24, R27, R39


The sentiment on this card is from the Little Woodland Library Friends Stamp Set.  


This turned out to be such a cute card.  Stay tuned for more ideas.


Thanks for stopping by today!!!


Sandy


Congrats Grad!


Hello!  Oh My!!!  I have had the best time playing with the new interactive die from Lawn Fawn called the Pull and Slide Surprise.  I love making interactive cards and have made many but this die is so easy I can hardly believe it.

This card can hold either a gift card or cash.  I photographed it with cash so you could see how well it fits.  
Since it is that time of year again, I can always use a Graduation Card.  I used the die along with patterned paper to cut out and make the mechanism of the card.  To decorate it, I used the cap and diploma from the Woodland Critter Huggers Graduation Add On


The little money jar is made from the How You Bean Stamp Set and coordinating die, along with the How You Bean Money Add On Stamp Set  and coordinating die.  

My little friends are from You Autumn Know and Whoosh Kites.  They were colored with Copic markers in the following colors:

  • BG000, B000, B00
  • N1, N3, N5
  • Y02, Y08, Y17
  • YG11, YG13, YG05, YG09, G07
  • E50, E53, E55, E57
  • R20, R21


The sentiment on this card is from the How You Bean Money Add On Stamp Set.  

I am absolutely crazy about this card and will be sharing another one in my next post.

Thank you for stopping by today and I hope you have a wonderful day!

Sandy


 Today this card is featured on Scrapbook Pal's, @scrapbookpal, Instagram account.  All the supplies are available at ScrapbookPal.com

I am just crazy about the new Honey Bee Pet-tastic Collection.  As a dog lover, there are so many fun dies and stamps.  This card was made with the Pet Friends Layering Stencil and the coordinating dies.  This will be the perfect card for giving down the road.


SUPPLIES:

Distress Oxide Ink:
·       Tumbled Glass
·       Broken China
·       Salty Ocean
·       Mowed Lawn
·       Vintage Photo
·       Squeezed Lemonade
·       Rusty Hinge
·       Villainous Potion

Stamps & Dies:
·       Pet-tastic (sentiment)
·       Pet Friends
·       Outside In Stitched Rectangle Stackables (Lawn Fawn)
·       Little Letter (Lawn Fawn)


Stencils:
·       Pet Friends


Tuesday, April 22, 2025

Build A Bird Feeder


Oh My Goodness this card turned out to be amazing, however, it is definitely not a very quick make.  I could have made it, or it could have been made with a full acetate background for the card front, but I wanted the card to have a feel of looking through the branches at the little friends busy in the meadow.

I have a YouTube video up that will be much more descriptive than this blog, just because there are so many steps, that going into detail would make it too long.

To start, I used a piece of cardstock cut 5.5" by 11".  I scored the paper at 4.25" and then scored it again 1/8" over from the first score line.  The card front is thick with the bird feeder and then with the additional layers on the inside, a simple score line will not give you enough room.  

I used a craft knife to cut an opening in the front cover that I could adhere the Branch Backdrop pieces to.  


I added a little Walnut Stain distress Oxide Ink to the branches on the backdrops.  


I wanted to have some seeds in my bird feeder, so I inked a piece of light brown cardstock for some color variation.  I also wanted it to stay put in the feeder so I applied adhesive film to both side of the cardstock and then used the die that is included with the Build A Bird Feeder Die Set to cut it out.  


For the bird feeders, I cut three fames, two pieces of acetate and two sets of the cap and tray.  I used Carved Pumpkin Distress  Oxide Ink to soften the edges and give it more depth.  To assemble them, I glued tray and top on two of them along with a piece of acetate.  I placed the birdseed at the bottom of one feeder, glued in the third frame.  I cut a couple of acetate strips to apply to the top and bottom of the feeder keep the feeder centered in the backdrop.  To finish the bird feeder, I glued the second decorated one on top of the other two.  


As I was making the front of the card, I realized that I needed someplace to put the sentiment, so I cut a piece of green cardstock using the Simple Grassy Border Die to cut a piece of ground for the card front and then cut two more ground pieces for the inside of the card.  I heat embossed the "Happy Birthday" sentiment from the Simply Sentiments Stamp Set.  

For the inside background, I inked a piece of white cardstock with a light layer of Tumbled Glass Distress Oxide Ink and then used the Cloudy Stencil to lightly lay in some clouds.  Once that was dry, I used the Stratus Cloud Stencil with white pigment ink to lay in some more clouds on top. 

Once I glued my grassy pieces on the Branches Backdrops, I glued the backdrops to the card piece.  I made sure to  adhere the birdfeeder to the frame before  I put glued the backdrops to the card frame piece. 

Since I had several layers now on the front of the card, the branches had gaps because the backdrop pieces were separated by the card frame.  To fill the gaps, I cut out another Branch Backdrop and then trimmed the branches off  where I needed to fill the gaps.  This probably doesn't make much sense, but if you watch the video, you will see what I do to fortify the branches.  


I used the leaf dies that are included with the Branches Backdrop to cut out the leaves for my branches.  For the green on my leaves, I inked white cardstock with Twisted Citron, Mowed Lawn and Rustic Wilderness Distress Oxide Ink.  


To finish the inside of my card, I cut my inked background piece to 4" x 5.25", adhered my two grassy pieces to the bottom and then glued the whole piece to the right inside piece.  


The images are from the Backyard Bird Feeder, Backyard Bird Feeder Add On and the coordinating dies.  I colored them with Copic markers in the following colors:

·       Y02, Y38

·       B00, B02, B04

·       T0, T2, T5

·       R24, R29, R39

·       E30, E33, E37

·       E70, E71, E74, E41

·       RV10, RV23

·       G21, G46, G28


I just placed my little friends and other elements where I felt they looked best always keeping in mind where they would show from the front of the card.  Once I had everything in place, I felt like I had a lot of open space in the sky so I used the Simple Puffy Cloud Frames to cut out a few clouds to fill in the open area.


Phew!  That just about completes this card.  Like I said, it is pretty time intensive, but definitely impactful.

Thanks you so much for stopping by today.  

Sandy


Thursday, April 17, 2025

Under The Weather?


Hello again!  Today I have a really neat interactive card that combines Trinity Stamps and Lawn Fawn Dies.  I am also linking a YouTube video at the bottom of this post if you want to follow along in the process of making this card.

To start, I cut a piece of light blue cardstock 4'25" x 11.0" and scored at 4.25".  I cut three pieces of patterned paper to 4.0" x 5.25".  

For the front of the card, I glued one piece of the patterned paper.  Using the cloud die from the Trinity Stamps Scenic Borders: Slim Line Series, I cut out two pieces of clouds from a light gray cardstock.  I dusted the edges with Hickory Smoke Distress Oxide Ink.  I layered the cloud piece and cut them to 4" wide.  

Using the Grassy Die Border and the Little Picket Fence Border by Lawn Fawn, I cut out the grass from green cardstock and the fence from white cardstock.  I inked the edges with Mowed Lawn Distress Oxide Ink and Hickory Smoke Distress Oxide Ink.  

Using the Trinity Stamps Simply Sentimental: Friends Die, I cut out the "friend" word from a dark gray and glued it on the clouds.  The sentiment on the front of the card is from Trinity's Healing Wishes stamp and coordinating die set.  I added some little raindrops that were cut from some pixie dust cardstock.  


The little images were stamped and die cut from Trinity Stamps Indispensable stamp and coordinating die set using Copic markers in the following colors:

  • YR16, YR68, YR18
  • B0000, BG000
  • R30, R20, R21

For the inside of the card, I used Lawn Fawn's Swivel Surprise Die to cut out the interactive mechanism from white 80lb cardstock.  I used the die to cut out the light blue circle pieces, the gray banner with the "pill better soon" sentiment and the gray patterned paper circle piece.  I used Trinity Stamp's Clean Cut Layers Circles: Set A to cut out the white patterned paper.  


Once I have built the interactive mechanism, I adhered it to the inside of the card after I had glued a piece of patterned paper centered on the side.  The best way to learn how to make this piece is to either watch my linked video or the video by Lawn Fawn, https://www.youtube.com/watch?v=_LwPOz6LNyI.  

Once I had the mechanism working and pieces exactly where I wanted them, I adhered the last piece of patterned paper on the left side of the inside of the card.  I left this side blank so that the card sender would have an area to write a message and sign.  


This is such a stinkin' cute card don't you think?  I can hardly wait to send it to someone feeling a bit "under the weather" .

Thanks so much for stopping by today and I hope you are doing well!

Sandy


Tuesday, April 15, 2025

Happy Easter!


 Yikes!!  It's almost Easter and I haven't made very many cards this year.  Better late than never right?

For this shaker card, I used the Trinity Stamps Picket Fence Cut Out Die Set.  For the front of my shaker, I used the third largest rectangle from the A-2 Clean Cut Layers Rectangle Set A.  I centered the Picket Fence Cut Out Die on a piece of patterned paper.  I made sure to leave enough room for the sentiment.  To get the white fence, I ran the Picket Fence Die through my machine with white cardstock and then trimmed it out of the opening.  I adhered the fence on top of the patterned paper.  The clouds and the grass were also cut with this die.  The grass was cut from white cardstock that was inked with Mowed Lawn Distress Oxide Ink.  

For the background inside the shaker, I inked in some clouds using a cloud stencil and Tumbled Glass Distress Oxide Ink.  I also used a little Mowed Lawn Distress Oxide Ink at the base of the fence.  

To create the "well" where the shaker bits go, I used two layers of foam tape to give it enough depth for the shakers to move freely.  

My little bunny is from the Trinity Stamps Hip Hop Hooray Stamp Set and Coordinating Die Set.

I colored him with Copic Markers in the following colors:

  • YR000, YR01, YR02
  • RV10
  • C00

I heat embossed the sentiment using white embossing powder and the Trinity Stamps Simply Sentimental Happy Stamp and Coordinating Die Set on pink paper.  The word "Easter" is stamped with black ink on white cardstock.

This turned out to be such a cute little shaker card.  I just love it!!!

Thanks for stopping by and I hope you have an amazing day!!

Sandy


Build A Bunny


 Hello!  Today I have a card that has been rattling around in my head.  This little bunny is standing next to my kind of plant - a succulent.  They are about the only plants that survive in my house. 

For the background on this card, I used a piece of Lawn Fawn's patterned paper called Fairy Godmother.  I use Speckled Egg Distress Oxide Ink with the Brick Stencil.  

The plants and two of the pots are from the Planrt A Succulent.  The tall planter on the right is from the Little Flowers Die Set.  I used the Harvest Crate Die Set to hold on of the plants.

I used Copic markers to color in the plants and the containers in the following colors:

·       YG41, YG61, YG63, YG67

·       G85

·       BG53

·       YR02, YR21, YR23

The bunny is from the Build A Bunny Die Set and his little overalls, are from the Build A Bunny
Add On Die Set.

The sentiment is the Scripty Hello Die.  I used the same Fairy Godmother  paper that I did for the background.  

This card didn't turn out like I had pictured it in my head, but that's all right.  Maybe next time, I will use colored cardstock for the planters and the plants.  Hmm.

Thank you for stopping by today and I hope that you have a great day!

Sandy


Wednesday, April 9, 2025

Honey Bee Stamps Large Dog


 Hello friends!  Today I am up on the Scrapbook Pal blog, @scrapbookpal, sharing this great pet card created with a few of the new products from Honey Bee’s Pet-tastic Collection.  This card would be perfect as a thank you for a pet sitter. 

The background of this card was created by stamping most of the stamps from the Tail Waggers stamp collection.  I did this by placing the stamps in my Mini Misti Stamping Tool by Sweet Petunia.

I inked my stamps using Lawn Fawn Clear Embossing Ink.  Once I had the desired impression, I sprinkled on Wow! Super Fine Clear Embossing Powder and heat set it.  To add a little extra sparkle, I spritzed it with Lumberjack Plaid Distress Spritz.  Using the  Lawn Fawn’s Outside In Stitched Rectangle Stackables, I cut the created backdrop to 5.25” x 4.0”. 

To make the dog, I used the Lovely Layers: Large Dog die set.  I used multiple colors of cardstock to cut out the individual pieces to create the dog. 

The is a downloadable chart on the Honey Bee website to help you place the layers in the correct order. I always find it very helpful the first time a put one together.  I used Bearly Art Precision Craft Glue to glue everything together.  Isn’t he just the most handsome boi???

To finish up my card, I used the Pet-tastic clear stamps and Pet-tastic dies to stamp and cut out my sentiment.  Once everything is assembled, I glued the completed piece to a 5.5” x 4.25” piece of cardstock to make a nice outside border and then will adhere it to a card base.

I am just crazy about all the fun pets in this collection and I am sure that I will be make all kinds of great cards with “all the things”. 

Thank you so much for stopping by today.  I hope you have found some inspiration from this post. 

Sandy


Tuesday, April 8, 2025

You Are Sew Amazing!


 Hello!  Today I have a card that I am entering in Lawn Fawn's Challenge 194 - Critters and Crafts.

I am planning on starting a quilt this week, so I thought that maybe my little friends would like to show off one that they made.  They are such a talented crew don't you think?

I made the little hanging quilt with the square and flower die from the Platform Pop Up Die.  My pieced squares are just a square cut corner to corned then then the quarter pieces are glued on top of a solid square.  It's hard to see in the picture, but I glued the quilt pieces on to a Stitched Scalloped Square Frame.  The paper that I used is from the Bitsy Blooms - Petite Paper Pack.


I glued my finished quilt to a background made with a piece of white cardstock cut with the Quilted Backdrop backed with a green  piece of cardstock cut to the same size.  I added a piece of woodgrain cardstock to the bottom to created the floor.

To finish the outside edge of the card, I cut the frame using the Stitched Rectangle Frame Die.  

The little mice and the sentiment are from the Sew Very Mice stamp and die collection.  They are colored with Copic markers in the following colors:

  • BG10, BG11, BG13
  • C1, C3, C5
  • RV11, R83
  • E53, E55
  • E31, E33, E35
  • R20, R22

I thought it would be fun to add some little thought bubbles, so I used the All The Speech Bubbles Stamp and Die set and one "thought" from the Simply Celebrate Critters Add On.  

This was actually a pretty quick card to make and it would be perfect for a sewing pal.

Thank you for stopping by and I hope you have a great day!!

Sandy

Monday, April 7, 2025

Caught A Bug?


Hello!  When I saw this  Alphabet Soup Die from Trinity Stamps, it reminded me of how I used to try to make words in my alphabet soup when I was a kid.  For this card, I have words that describe how or what you might feel like when you catch a bug.  

I wanted to make this card look like a place setting at the same time using the Circle Shaped Card Die Set.  I glued the circle card in the center of a 4.25" x 5.5" card base cut from woodgrain cardstock.  


I inked my placemat using the Checkered Background Stencil with Prize Ribbon Distress Oxide Ink.  I cut that down to 3.75" x 5.0".  The woodgrain cardstock that I glued it to, was touched up on the edges with Vintage Oxide Distress Oxide Ink to enhance the woodgrain.  I die cut the fork and spoon from a matte silver metallic cardstock using the dies included in the Alphabet Soup Die.


The "soup" in the bowl, was sprayed with YR07 and R08 COPIC markers using my COPIC airbrush system.  I used the die to cut out my words and glued them along with the peas and carrots in my soup.  

To give my bowl a little bit more dimension, I used a circle die from the Clean Cut Layers - Circles Set A, to cut out the inside of the bowl piece that has embossed edges.  Then I glued the embossed edges piece to a light gray circle cut from the Clean Cut Layers set.  Once I had my bowl of soup constructed, I glued it to a Circle Shaped Card Base cut from red cardstock.  I used the Clean Cut Layers set to cut out a white cardstock circle for the inside of the card. 

 
The sentiment on both the front and inside using the Healing Wishes Stamp and Die Set.  

This was a fun card to make and I hope it inspires you to create of your own.

Thank you for stopping by today and I hope you stay well!

Sandy