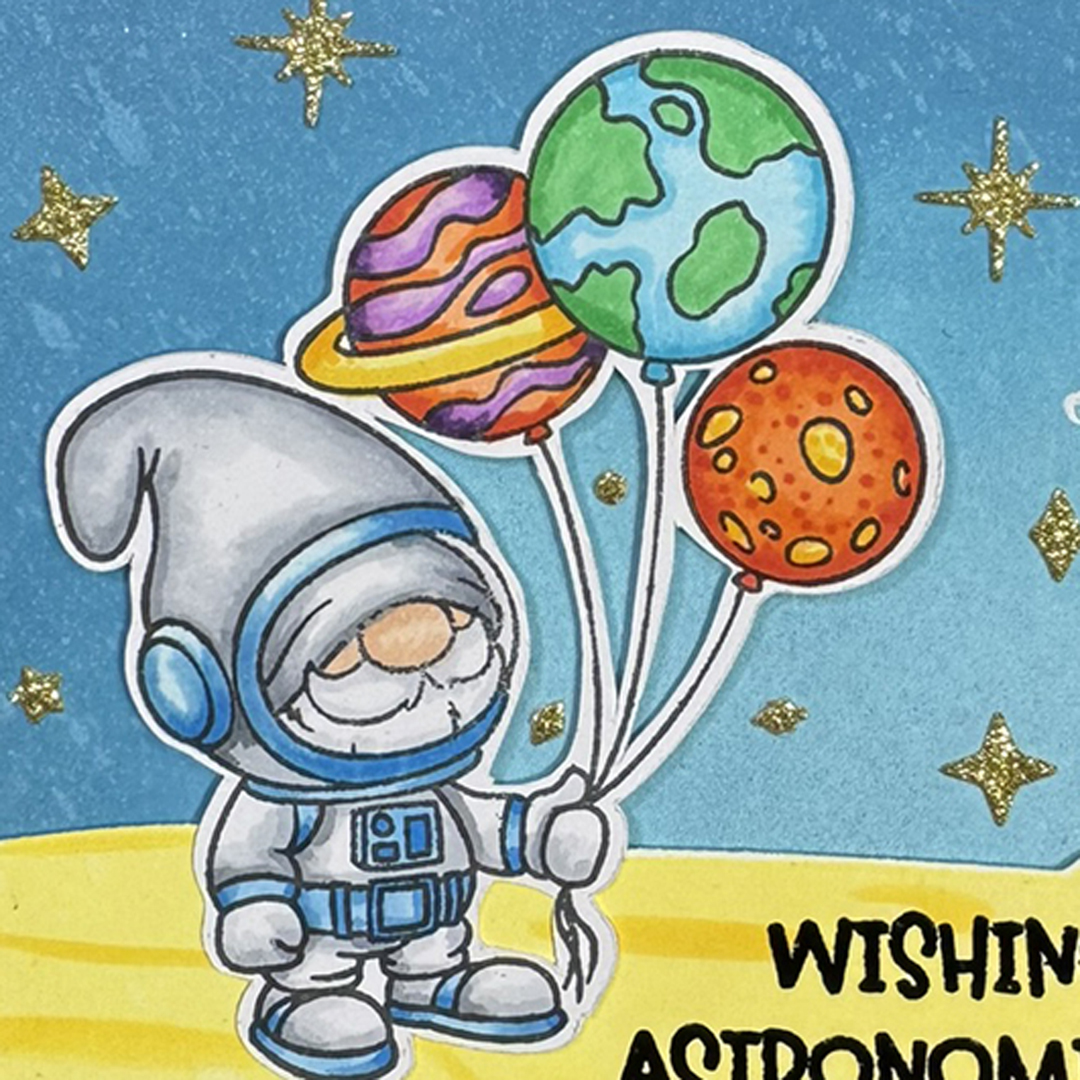
Hello! I love Gnomes! Always have and always will. Trinity Stamps has the best Gnomes ever. This stamp and die collection, Astronomical Gnomes, is from their new release. These little astro-gnomes are just the best.
The background sky is ink blended using Tumbled Glass, Broken China and Uncharted Mariner Distress Oxide Ink.
For the moon surface, I used the new Crater Layers Stencil and coordinating dies. I love this stencil not only because of the coordinating dies but that it also has a couple of different surface stencils. I used Squeezed Lemonade and Mustard Seed Distress Oxide Ink. I also spritzed it with Squeezed Lemonade Distress Spritz to give it a little shimmer.
I used the die included with the stencil set to cut out the moon surface and then heat embossed the sentiment that comes with the Astronomical Gnomes Stamp Set with black embossing powder on the lower right hand side.
My two little Astronauts are colored with Copic Markers in the following colors:
C0, C1, C2, C4, C6 - Gray's
E00, E11 - Skin
B12, B14, B16 - Blue Suit Trim
V01, VO4, V09, V05 - Purples
Y13, Y15, Y17 - Yellows
YR65, YR68, R17 - Oranges
G03, G09, FBG2, BG05, BG02 - Earth Balloon
To give my card a little dimension, I used foam squares on the back of the moon and the gnomes. I cut some stars from gold glitter cardstock using the die that comes with the Crater Layers Die.
Who couldn't just love these guys???
Thanks for stopping by and I hope you have an "Astronomical" day!!!
Greetings!!! Today I have a card with a trio of Martians looking for a stellar friend and apparently they looked every where!
This past fall, I became aware of the Copic Airbrush System and I have been playing around with it on a few different cards. It is perfect for backgrounds if I am looking for a particular color that can't be found in my stamp pad collection and makes it easy to blend several colors. I used this system for the coloring on the background and the moon surface and I love the blues and purples in the sky.
I am starting with a piece of white cardstock cut to 6" x 6". For the moon, I used the Crater Stencil Layers and sprayed Y08 for the main color and then sprayed Y35 for the craters and crevasses.
In order to mask off the moon, I used the die from the Crater Stencil Layers set to cut out the outline of the moon from some scrap paper and tacked it down. I wanted to include the meteor from the stencil in my background, so once I determined where I wanted to place it, I tacked it down to my surface. I also used some temporary tape to cover up the other openings in the stencil so I wouldn't get ink where I didn't want it.
The meteor base color is Y07 and then I added some shading using RV19. On a piece of Post It Note, I used the stencil to spray another meteor that I could cut out and use as a mask.
Once I had the meteor masked, I sprayed the background first with V05, then V09 and finished up with B69.
Next, I peeled off the mask over the meteor and go back in with my marker to cover any areas that are still white and did not get sprayed. I will remove the lower mask covering up my moon and then cut my background to 4.0" x 5.25" using a die. To help me line up where I want to cut my background, I used a scrap stamped image,
Since everything is so vivid in color, I decided to carry that through to the sentiment. I air brushed a piece of white cardstock with YG06. I heat embossed and die cut the sentiment from the You're Stellar stamp and die set.
All the images were colored with Copic markers in the following colors:
Y13,
Y15,Y17
V01,
V04, V06, V09
C0,
C2, C4, C6
YR65,
YR68, R17
RV21,
RV14, RV29
B000, B01, B02
I glued the sentiment directly to the background but did pop up the flying saucers with thin foam squares.
To finish up my card, I used added some stars cut from silver glittered cardstock. I used the die that also comes with the Crater Layers Stencil and Die set. As you might be able to tell, this is a very versatile set.
There is a link at the bottom of this post to a video I have posted on YouTube to show the process of creating this card in greater detail. I hope you'll stop by my channel and give me a thumbs up.
Thank you for stopping by today and I hope your day is "stellar"!
Hello! What could be better than a card with flying saucers? Well...an interactive one of course. Today I have a card that I created using the new Trinity Stamps You're Stellar Stamp and coordinating Die set. The interactive element was created using Lawn Fawn's Swish and Pop die set.
For this card, I needed to make a planet for the one flying saucer to come out from behind. To make the planet, I inked a piece of white cardstock with Picked Raspberry Distress Oxide Ink. To give the planet a little more interest, I used the Honey Bee Waves Stencil with Ripe Persimmon Ink. Once my ink dried, I cut the circle using the Clean Cut Layers - Circles Set A to cut out my planet.
To make the moon surface that my little friend stands on, I cut a piece of white cardstock 2.5" x 6". I used the border die from the Crater Layers Stencil & Die to cut out my moon surface. Once I had that cut out, I inked it with Mustard Seed Distress Oxide Ink. Once the ink was dry, I used the stencil to ink on the craters and crevasses using Carved Pumpkin Distress Oxide Ink. I had to move the stencil a few times in order to cover the piece with craters.
For the sky, I inked white cardstock with Salty Ocean, Prize Ribbon and Chipped Sapphire Distress Oxide Ink. Once I had it blended the way I liked it, I spritzed it will a little water and blotted it with a paper towel. I also watered down and spattered white acrylic paint on cardstock. Once that was dry, I cut it to 4.25" x 5.5".
I used the Swish and Pop die set to build the interactive mechanism. I have a link at the bottom of this post to my YouTube Video showing exactly how I built it.
To make the front part of my card, I used the A-2 Clean Cut Layers Rectangle Set A dies to cut out a frame from black glitter cardstock. I glued the moon surface piece and the planet to the glitter frame.
With the moving arms on the background and the front part of my card built, I played around with the way the arm moved from behind the "planet" and the placement of the flying sauce on the acetate arm. I placed foam dots to help limit the movement of the arm to get the best visual effect.
With the mechanism in perfect placement, I used the die set to cut out a notch in the front card to help the card recipient know what to do.
I place foam tape around the outside of the frame piece and some other support piece to hold up the moon surface making sure that none of the foam impeded the movement of the mechanism. It takes a bit of fiddling but it is worth it.
All the images are colored with Copic markers in the following colors:
B0000,
B000, B01, BO2
BG13,
BG15, BG49
Y08,
Y19
YR02,
YR09, R17
YG07,
YG13
C3,
C5, C7
Once my pieces were stamped, colored and cut out, I adhered them to my card.
This card can be a little bit tricky but having the flying saucer pop out from behind the planet is worth the fiddling. It would be a really fun card to give to a Sci-Fi fan don't you think?
Don't forget to watch my YouTube video for a more detailed process to make this card. The link is below.
Thank you for stopping by today and I hope you have an astronomical day!
Hello! Oh my goodness these little Astro-Gnomes are so very adventurous. Today I have a gate fold card featuring the new release from Trinity Stamps. Have I mentioned that I love Gnomes in general but I love coloring and creating with the Gnomes Trinity Stamps make. Love, love, love them.
I had set out to make an arch card using the Arch Shaped Card Die Set, but my die cutting machine wasn't big enough to hand the die that cuts the actual arch card. Yikes! Well I am not one to give up easily. I cut a piece of cardstock 5.0" x 11" and scored it at 4.75". I folded it in half, taped an arch shape just off the edge at the fold and ran it through my die cut machine. Ta! Da!
I placed the card, opened up, in my paper trimmer and trimmed off 2.375" from the bottom to the fold. I used my scissors to trim top of the arch off to create the gate fold.
Next I cut two pieces of white cardstock 2.5" x 5.0". I placed the border die from the Crater Layers Stencil and Die set along the top them and ran it through my die cut machine. I will ink one of them with Mustard Seed Distress Oxide Ink and use the stencil with Carved Pumpkin Distress Oxide Ink to add the craters and crevasses.
I want the moon surface to carry through to the inside of the card, so to ink that, I needed to cut a mask using the same border die from a piece of scrap cardstock. I will use a piece of low tack tap to hold the mask in place and then I will ink the inside of the card the same way I just inked the front moon piece.
Next, I masked off the bottom and proceeded to ink blend my nighttime sky. I used Tumbled Glass, Broken China and Uncharted Mariner Distress Oxide to blend the sky. Once I had it blended, I spritzed it with the water and blotted it with paper towel.
I applied the moon surface to the front gate of the card and trimmed off the excess using my ruler and rotary cutter. I applied my images starting with the rocket ship. The ink from my coloring had bled through to the back of my images, so I cut out the shapes of the images using blank white cardstock to cover the backs and then trimmed the second moon piece that I cut to the right size and adhered it over the pieces that covered the rocket and the Gnome's balloons.
I heat embossed the sentiment on the inside panel using black embossing powder.
The images are from the Astronomical Gnomes and You're Stellar stamp sets. They are colored with Copic markers in the following colors;
Y13,
Y15,Y17
V01,
V04, V06, V09
C0,
C2, C4, C6
YR65,
YR68, R17
RV21,
RV14, RV29
BG11,
BG13, BG45
G03,
G09, FBG2, BG05, BG02 - Earth Balloon
I adhered my flying Gnome and then added a few stars that were cut from silver glittered cardstock. I used the die from the Crater Layer Stencil Dies.
In order to "beef up" the back panel and cover the ink that had gotten on it, I cut another arch shape and glued it to the back.
This is such a fun card! I love everything about it!
Thank you for stopping by today. I have made a YouTube Video if you would like to see the process of making this card. I will post a link at the bottom of this post.