Tuesday, May 6, 2025

Seed-sational Birthday Card


How fun is this birthday card?  I love interactive cards so I combined some of the new Backyard Bird stamps and Swivel Surprise Interactive Die from Lawn Fawn.  I also used paper from the Pint Size Patterns-Summertime Collection.

I felt like this card needed to be square as opposed to the A2 size so I could get everything on it.  I have done the Swivel Surprise using a square card before and I have a tutorial on YouTube that you can refer to for the changes needed to make the mechanism work on a larger card.  There is a link at the bottom of this post.

I used the Stratus Cloud Stencil with Stormy Sky Distress Oxide Ink for the background sky.  Using the Hillside Border Die, I cut Cilantro and Algae Cardstock for the hillside.  I dusted the edges of the hills with a little Rustic Wilderness Distress Oxide Ink.  

My little friends, flowers and birdfeeders are from the Backyard Bird Feeder Stamp and Die Collection along with the Backyard Bird Feeder Add On Stamp and Die Collection.  The coloring was done with Copic Markers in the following colors:  

  • E41, E43, E44, R12, R14 - Birds
  • Y23, YR24, YR27 - Squirrel
  • R14, R17, R29 - Reds
  • E13, E23, E25 - Browns
  • R11, R21 - Pinks
  • YG03, YG25, YG17 - Greens
  • Y02, Y08, Y17  - Yellows
  • E50, E30, B0000, BG000 - Bird Seed


For the front of this card, I used the Build A Birdfeeder but didn't make it into a shaker element.  Because of the size of this card, I needed a large branch to hang it from, so I used the branch and leaves die that comes with the Magic Iris Beehive Add On.  I really like the Tree Branches Backdrop, but it wasn't going to work for this card without a few modifications.  To trim out this card, I cut two Stitched Rectangle Frames and then cut the long sides off and trimmed them to fit the outside of the card.  Then I cut a Tree Branches Backdrop and clipped off the branches that looked best and glued them where I felt they fit best.  I used the die set to cut the leaves from Algae cardstock dusted with a little Rustic Wilderness Distress Oxide Ink.  I also cut a hillside to add a little depth to the card using Algae cardstock and the Simple Stitched Hillside Border.  


I added a few little birds from the Backyard Bird Feed Stamp and Die Collection.  The hello is cut from a die that is included with the Pull and Slide Surprise Die Set.  


This isn't the quickest card to make but it sure does have a lot of "wow" factor.  


Thanks for stopping by and I hope you have a "seed-sational" day!


Sandy


***This is the video that show you how to make a square Swivel Surprise card.


Monday, May 5, 2025

You're Stellar!

Greetings!!!  I have circle card today using Trinity Stamps You're Stellar Stamp and Die Collection.  I thought it would be fun to combine the Circle Shaped Card Die Set and the Full Moon Stencil to create a giant moon for the background on this card.

Using the Clean Cut Layers - Circles Set A, I cut out my moon from Yellow Cardstock and then used Squeezed Lemonade and Mustard Seed Distress Oxide Ink along with the stencil to create my moon.  

I stamped the Rocket Ship from the You're Stellar Stamp Set and used the coordinating die to cut it out.  I used Copic markers in the following colors:

  • YR02, YR09, R17
  • V01, V04, V06, V09
  • C2, C4, C6
  • Y08, Y15, Y35
  • B0000, B00, B01, B02


Once I decided on the placement of my rocket on my moon, I heat embossed some stars from the stamp set using gold embossing powder.  I also used the sentiment from the set on the front and on the inside of the card. 


This was such a quick card to make and it would look great with the flying saucer on it in place of the rocket ship.


Thanks for stopping by and I hope you have a stellar day!!!


Sandy


Sunday, May 4, 2025

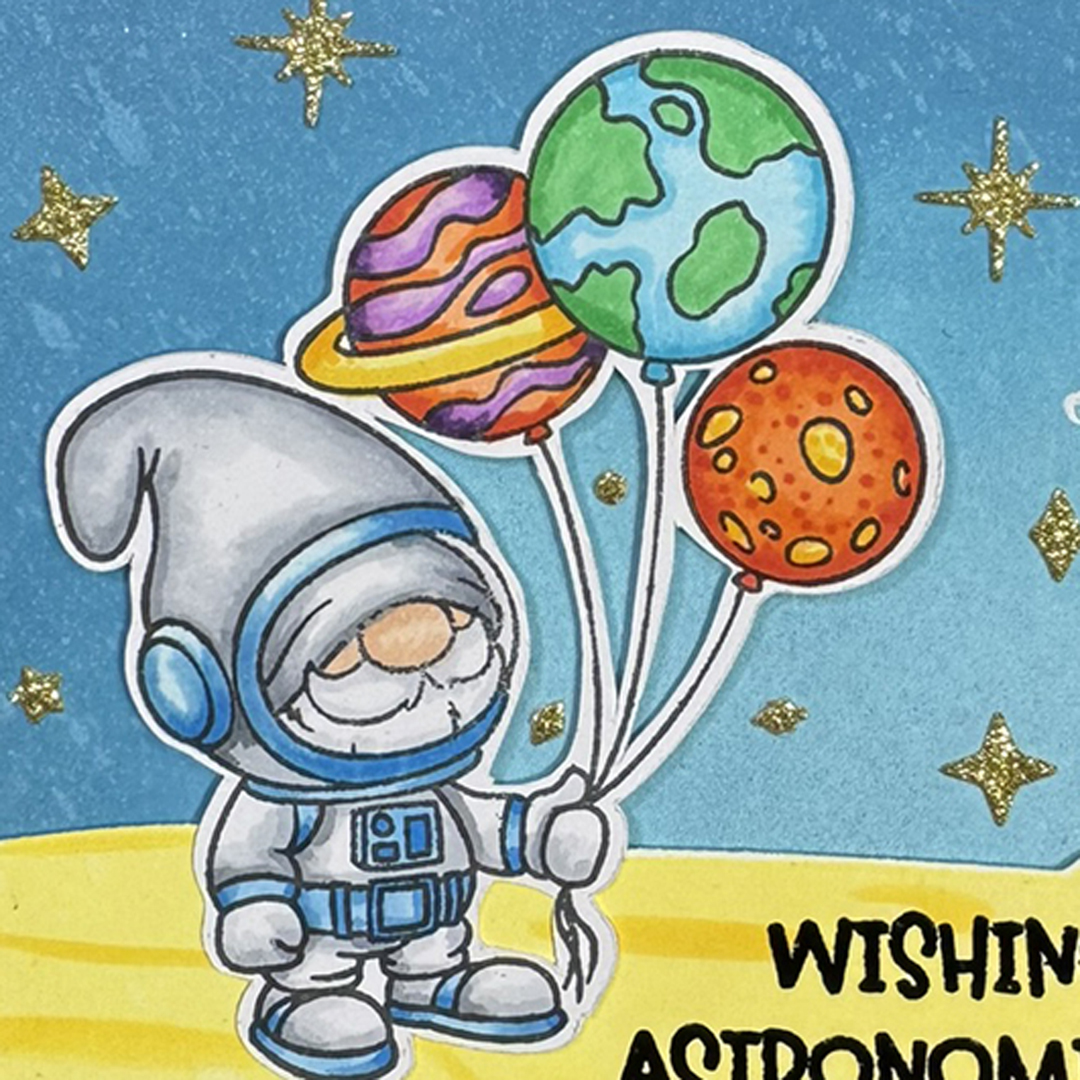
Astronomical Gnomes


 Hello!  I love Gnomes!  Always have and always will.  Trinity Stamps has the best Gnomes ever.  This stamp and die collection, Astronomical Gnomes, is from their new release.  These little astro-gnomes are just the best.  

The background sky is ink blended using Tumbled Glass, Broken China and Uncharted Mariner Distress Oxide Ink.

For the moon surface, I used the new Crater Layers Stencil and coordinating dies.  I love this stencil not only because of the coordinating dies but that it also has a couple of different surface stencils.  I used Squeezed Lemonade and Mustard Seed Distress Oxide Ink.  I also spritzed it with Squeezed Lemonade Distress Spritz to give it a little shimmer.


I used the die included with the stencil set to cut out the moon surface and then heat embossed the sentiment that comes with the Astronomical Gnomes Stamp Set with black embossing powder on the lower right hand side.  


My two little Astronauts are colored with Copic Markers in the following colors:

  • C0, C1, C2, C4, C6 - Gray's
  • E00, E11 - Skin
  • B12, B14, B16 - Blue Suit Trim
  • V01, VO4, V09, V05 - Purples
  • Y13, Y15, Y17 - Yellows
  • YR65, YR68, R17 - Oranges
  • G03, G09, FBG2, BG05, BG02 - Earth Balloon

To give my card a little dimension, I used foam squares on the back of the moon and the gnomes.  I cut some stars from gold glitter cardstock using the die that comes with the Crater Layers Die.  

Who couldn't just love these guys???

Thanks for stopping by and I hope you have an "Astronomical" day!!!

Sandy


Friday, May 2, 2025

You're Stellar!


Greetings!!!  Today I have a card with a trio of Martians looking for a stellar friend and apparently they looked every where!

This past fall, I became aware of the Copic Airbrush System and I have been playing around with it on a few different cards.  It  is perfect for backgrounds if I am looking for a particular color that can't be found in my stamp pad collection and makes it easy to blend several colors.  I used this system for the coloring on the background and the moon surface and I love the blues and purples in the sky.

I am starting with a piece of white cardstock cut to 6" x 6".  For the moon, I used the Crater Stencil Layers and sprayed Y08 for the main color and then sprayed Y35 for the craters and crevasses. 

In order to mask off the moon, I used the die from the Crater Stencil Layers set to cut out the outline of the moon from some scrap paper and tacked it down.  I wanted to include the meteor from the stencil in my background, so once I determined where I wanted to place it, I tacked it down to my surface.  I also used some temporary tape to cover up the other openings in the stencil so I wouldn't get ink where I didn't want it.

The meteor base color is Y07 and then I added some shading using RV19.  On a piece of Post It Note, I used the stencil to spray another meteor that I could cut out and use as a mask.  

Once I had the meteor masked, I sprayed the background first with V05, then V09 and finished up with B69.  

Next, I peeled off the mask over the meteor and go back in with my marker to cover any areas that are still white and did not get sprayed.  I will remove the lower mask covering up my moon and then cut my background to 4.0" x 5.25" using a die.  To help me line up where I want to cut my background, I used a scrap stamped image,

Since everything is so vivid in color, I decided to carry that through to the sentiment.  I air brushed a piece of white cardstock with YG06.  I heat embossed and die cut the sentiment from the You're Stellar stamp and die set.  

All the images were colored with Copic markers in the following colors:

  • Y13, Y15,Y17
  • V01, V04, V06, V09
  • C0, C2, C4, C6
  • YR65, YR68, R17
  • RV21, RV14, RV29
  • B000, B01, B02
I glued the sentiment directly to the background but did pop up the flying saucers with thin foam squares.  

To finish up my card, I used added some stars cut from silver glittered cardstock.  I used the die that also comes with the Crater Layers Stencil and Die set.  As you might be able to tell, this is a very versatile set.  

There is a link at the bottom of this post to a video I have posted on YouTube to show the process of creating this card in greater detail.  I hope you'll stop by my channel and give me a thumbs up.

Thank you for stopping by today and I hope your day is "stellar"!


Sandy