Hi there! I have another submission for Craft Roulette Episode #272. I thought that the parameters sounded kind of fun and I had a little extra time this weekend, so I jumped in again. The parameters were:
Project: Thank You
Colors: Flying Kites
Element: Space
Random: High-Falutin' Paper
My card is definitely a "thank you" card. I think I have enough colors on the card for "flying kites". Plus, my dino friend is being lifted up by balloons and kites can be red. That should count, right? My "outer space" is the sky. The "high-falutin' paper" is my burlap paper.
I inked the sky background and the upper tab with Tumbled Glass Distress Oxide Ink using Trinity Stamps Puffy Cloud Layers Stencil. I lightly dusted the edges of the lower tab, which was cut from brown cardstock, with Walnut Stain Distress Oxide.
I used the Trinity Stamps Emergency Card Die #3 - Double Slider to make my card interactive. I have a link at the bottom of this post, that shows the construction of the mechanism if you would like the details on how to use the die.
The "thank you" sentiment is cut from Trinity Stamps Simply Sentimental: Thank You die set.
My little friends are stamped from Trinity's T-riffic Dinos stamp set using Copic Markers in the following colors:
YR20,
YR21, YR23, YR24, YR27
G21,
YG61, YG63
R17,
R27, R39
I used the coordinating dies to cut them out.
I also used the sentiments from that set to heat emboss them with white embossing powder. I also cut them out using the coordinating dies.
I adhered the dino's to my card and then added a few clouds using the clouds from Trinity's Picket Fence Cut Out Die Set. I also used some hearts cut from cardstock to add a little "extra" to my card.
Thank you for stopping by and I hope that you have a great day!
It's officially Summer! Today I have the perfect summer card that just makes me smile. I have used the new Poolside Pets Stamps and Coordinating Dies from Catherine Pooler and the Take A Dip Shaker Die. ADORBS!!!!
For the background on this card, I inked white cardstock with Twisted Citron and Mowed Lawn Distress Oxide Ink. The lower layer, which in the pool water, is inked with Tumbled Galss, Mermaid Lagoon, and Salvaged Patina. To give the "water" a little bit of movement, I used the Cow Print Stencil from Trinity Stamps. I lightly inked the cardstock with Tumbled Glass. I laid the stencil on top and inked in the Mermaid Lagoon, then I moved the stencil to a different spot and then inked in the Salvaged Patina.
I used the Take A Dip Shaker Die to cut the pool from the Twisted Citron inked cardstock. I also cut the pool and the surrounding tiles from gray cardstock lightly dusted with Hickory Smoke Distress Oxide Ink.
To created the well for the shaker pieces, I laid the pool shape that was cut out from the Twisted Citron cardstock on the lower layer and placed double sided adhesive foam tape around the shape. I used two layers of 2mm .25" tape. I filled in the rest of that layer with more tape in the open areas. I filled the well with Iridescent Cobalt Shaker Pop Elements from Trinity Stamps and sealed them in by placing a piece of acetate cut to 4.0" x 5.25" on top of the tape.
I glued the Twisted Citron layer and gray tile trim on top of the acetate. Now it's time to decorate the top of the card.
Make sure to color multiple rafts so that you have enough to fill in the front of the card. When I was making my card, I had just put my little friends in the pool and felt like the card had a lot of blank space, so I placed some rafts randomly on the outside of the pool and trimmed off where they were hanging over the edges.
For the sentiment, I used the the dies from Trinity Stamps Sunshine Die Set.
This is such a fun and colorful card and the icing on the cake, so to say, is that the shaker elements create such a fun noise when moved around.
Thank you so much for stopping by today and I hope you have a fantastic summer!!!
Greetings Earthlings! I am jumping back into the latest Trinity Stamps release. This was also my first time using Trinity Stamps Blending Buddies. Oh my gosh! What a game changer!!! I love these brushes. They not only give you ink control, but they are very comfortable to use, so there is no hand fatigue. Love! Love ! Love!
For the background on this card, I used white cardstock with Prize Ribbon, Peacock Feathers, Wilted Violet Distress Oxide Ink. Once my ink was dry, I used the Starfield Letterpress Die along with Tangerine Glimmer Foil from Spellbinders to apply my sparkly stars.
I also used the Crater Layers Layering Stencil and Die to ink my moon surface. I used Lost Shadow, Hickory Smoker and Black Soot Distress Oxide to make my moon layer.
I always save the extra foil from my background foiling and use them along with a solid foil plate from Fresh Pink. I had a lot of silver foil left over from another card project using the Starfield Letterpress, so I used some of that foil and pressed it on black cardstock for my rocket ship.
I cut my rocket ship from it using the Blast Off Die Set. I will definitely save the scraps for another project. In fact, I cut the window and tip of the ship from some scrap I had left over from another foiling project. To finish my rocket, I used black cardstock and added a few highlights using a while gel pen.
I seem to have a slight addiction to the Emergency Card Die #3 - Double Slider but for this card, I just have single slide. I wanted the Gnome with the rocket balloon from the Astronomical Gnomes Stamp Set to float up next to the rocket ship so I needed to make sure that I lined up the sliding mechanism with the right edge of the card. I also used that placement to cut out the notch at the top in the right spot. I have linked my YouTube video at the bottom of this post so that you can follow along with the assembly and placement of the mechanism.
Once I had my mechanism in place, I built up the rest of the card with double sided adhesive foam tape. This was the first time I had used 1mm foam tape on the front of the mechanism and it worked great, so I only had to build up the rest of the card using 2mm tape. This make a much slimmer card as opposed to the 4mm one I had made in the past.
I stamped my Gnome from the Astronomical Gnome Stamp Set and my planets and sun were stamped from the Out Of This World Stamp Set. They were cut out with their coordination dies and were colored with Copic markers in the following colors:
BG10,
BG15, BG49
Y19,
YR16
Y00,
Y02, Y13, Y19 - Yellows
E00,
E02 - Skin
B000,
B00, B02, B04 - Blues
V12,
V15, V17
C0,
C1, C3, C4
I highlighted the images with a white gel pen and then adhered them to the card.
I used the sentiment that was included with the Astronomical Gnomes Stamp Set. I heat embossed it with white embossing powder and then cut them out with the coordinating die.
I love the bright colors on this card and the foiled rocket ship! How about you!
Thank you so much for stopping by, if you get a chance to check out my YouTube Video, I would be grateful for a "thumbs up". I hope you have a stellar day!
Hello friends. Today I have a card that I CASED from @carrierhrhoades. She did a "live" on YouTube this morning for @trinitystampsllc featuring the cutest cupcake card with the Tiny Alien and a Candle Light from @pearblossompress. It was so darn cute!
I hadn't had a chance to use my Cupcake Card Die yet, so I thought I would get it out and see what I could come up with. I also hadn't made a card with the Candle Light yet. I can't tell you how easy the light sets are from Pear Blossom Press. I love them!
While I am still not done playing with all the fun things from Trinity Stamps last release, I dug out my favorite Summer Gnome Fun. I thought that it would be cute to have the surfing Gnome, surfing through the frosting on the cupcake.
For the bottom of the cupcake, I added a layer of sand by inking a piece of white cardstock with Tea Dye and Vintage Photo Distress Oxide Ink. I used the Scenic Border Slimline Die along with the paper liner part of the Cupcake Card Die.
The cupcake frosting is cut from white cardstock that was dusted with a little Tumbled Glass and Mermaid Lagoon Distress Oxide Ink.
My friends were stamped and die cut with their coordinating dies from the Summer Gnome Fun stamp set. The candle was from the Hey, Cupcake stamp set. It was also cut out with the coordinating die. They were colored with Copic markers in the following colors:
C1,
C3
YR02,
YR07, YR18
Y02,
Y06, Y19
BG13,
BG15, BG07
B00,
B01
E00,
E02
I used the Papercrafting Magic stamp set to stamp the word "push" so that the card recipient would know to do something special. I used the fish from the Gnomies Under The Sea as a fun way to draw attention to the Candle Light Button.
Once I had the base of my card built, I placed some double sided foam tape around the Candle Light to lift my frosting up so that it would be level with the button. Once that was done and I was sure that there wasn't any foam tape showing, I adhered the frosting to the tape.
I adhered my guys to the card. The sentiment on the front of the card is from the Summer Gnome Fun set. I heat embossed it with white embossing powder. I popped up the sentiment and Gnome on the bottom of the card with foam tape to give the bottom of my card a little dimension.
For the inside of the card, I used the sentiments from the Hey, Cupcake stamp set. I heat embossed with with white embossing powder.
I think card is so cool because you can blow out the candle on the cupcake. I can't wait to make some more.
Thank you to Carrie Rhoades and Trinity Stamps for the inspiration!!!!!
Thanks for stopping by and I hope you have a great day!!!
Hello friends! It is finally Summertime. I hope you are as excited about that as I am. Today I have a card featured on the ScrapbookPal Blog. This card has my dream car on it and I thought I might combine it with a background that had a vintage 70’s vibe. I hope you have great and fun summer!
Everything to make this card can be found on ScrapbookPal.com
Happy Summer Friends! I know, I know, it's too early for Halloween, but let me explain. The current Lawn Fawn Challenge #198 is Up, Up and Away. Bats and Bubbles go up, up and away don't they! Plus, I am always looking for a reason to craft a Halloween Card.
This interactive card is created using the Pull 'n Slide Surprise Die. I am a huge fan of this die, because it is easy and once constructed, it still easily fits in an envelope without any extra postage. Win! Win!
To create a wall and floor background for my card, I used a 5.5" x 11", piece of cardstock. I inked the long side of the cardstock, so I will have two matching pieces - one for the die cut top and one that will go underneath it.
I masked off about 2.5" from the bottom and inked the area with Vintage Photo Distress Oxide Ink. Using the Brick Stencil and Wilted Violet Distress Oxide Ink, I inked in my purple wall.
I used the Woodgrain Backdrops Stamp to stamp in my floor on both pieces, trying to keep the woodgrain lined up with the two.
Once my ink had dried, I went back over the area with my ink brush to put some color in the white areas that the stencil created. Leaving the masking in place, I spatted the wall with a little watered down black watercolor. I also inked the part of the mechanism that pulls out at the top of the card with the Brick Stencil and the Wilted Violet Distress Oxide Ink. I wanted it to blend in with the wall when pulled up.
I used the sentiments from the Fangtastic Friends Stamp Set on the part that is exposed when the tab is pulled up. I stamped it to the left side of the opening so I could put a hanging bat next to it.
The images on this card are from Fangtastic Friends, Fangtastic Friends Add On and the Purrfectly Wicked Stamp Sets. They were all colored in with Copic Markers in the following colors:
B000, B00, BG01
YR02, YR09
C1
R20, R21
V01, V15, V17
YG23
Y02, Y35
E55, E57, E59
Once I assembled the interactive mechanism on the card, I started building my scene. I cut the cauldron from black cardstock using the Build A Cauldron Die. I also cut my bubbles using the bubbles from the die set.
I attached my bats and bubbles to thin acetate strips and attached them to the back of my cauldron. Once I had them attached, I attached the cauldron to the card with the handles just below the fold that the die makes, that way when I pulled up on the tab, the bats and bubbles were free to "float" above it.
I decorated the pull tab with images from the Fangtastic Stamp Set as opposed to using it as a gift card holder. Then I attached foam tape on the back of the interactive card and adhered it to piece of black cardstock cut to 4.25" x 5.5". I used the Starry Sky Background Hot Foil Plate with fuchsia foil to add a little interest to it.
This turned out to be such a cute Halloween card and it was so simple.
Thank you for stopping by and I hope you are having a wonderful summer!!
After watching the Craft Roulette Challenge #270, I was so excited about two of the parameters, that I jumped in again this week. The parameters that inspired me were A7 and Arch.
A few weeks ago, I was shopping the JoAnn's Closeout Sale and came across the Tim Holtz Big Shot Switch Plus Machine marked down to $100. I had been wanting one of those for a long time, but just couldn't justify the cost when I already had two Big Shot Machines. Plus I would probably miss burning off all those calories cranking on the Big Shot - Ha! Ha!. I am not one to walk away from a good deal so of course it went home with me. One of the most exciting things about my purchase is that I was finally able to make the A7 arched card using the Trinity Stamps Arched Shaped Card Die. I have used a lot of the dies that come with the set, but never the card.
Back to Craft Roulette, so then the wheel landed on A7 and Arch, it was a no brainer! The other two parameters were 1980's colors and Interjection. The 1980's colors were easy, but I don't really have any "interjection" die cuts, so the word Love had to work.
Trinity Stamps came out with a fun stamp set this past spring called, You're Stellar, that reminded me of the Lisa Frank/My Little Pony things, so I felt that it would work perfect with the 1980's colors. Plus it has a really nice sentiment that I could use inside the card.
The heart from the You're Stellar Stamp set was colored with Copic Markers in the following colors:
V000,
V01, V04
RV10,
RV21, RV04
B00,
BG15, BG53
Y11,
Y06, Y18
YR07
I cut my card from black cardstock and then used the dies on the right side of the set to cut out my other arches. For my final arch layer, I used the Time Warp Letterpress Plate with some silver glimmer foil. That plate reminds me of Star Wars which also helped with the vibe I was looking for.
I cut the work "love" was cut from black cardstock using the Simply Sentimental: Love Die. For the letters, I used the same cardstock that the arches were cut from.
This was a super fast card to make. I was worried that it was going to be difficult to cover such a large area, but I let the dies and the paper do all the work.
Thanks for stopping by and I hope you have a stellar day!
Hello all!Today I am up on the ScrapbookPal Blog with this really sweet card that I
created with Honey Bee Stamps new All
Things New Stamp and Coordinating
Die Set.This card turned out so
pretty and I am very excited to share the process with you. Hop on over to Scrapbook Pal to get all the things to make it!!
I usually start my cards with the background, but I
wasn’t sure what colors my butterflies were going to be, so I waited.
I kept the coloring of the butterflies really simple, so
they are very quick to color. I used
Copic markers in the following colors:
Once I had them colored, I used the coordinating dies to cut
them out.
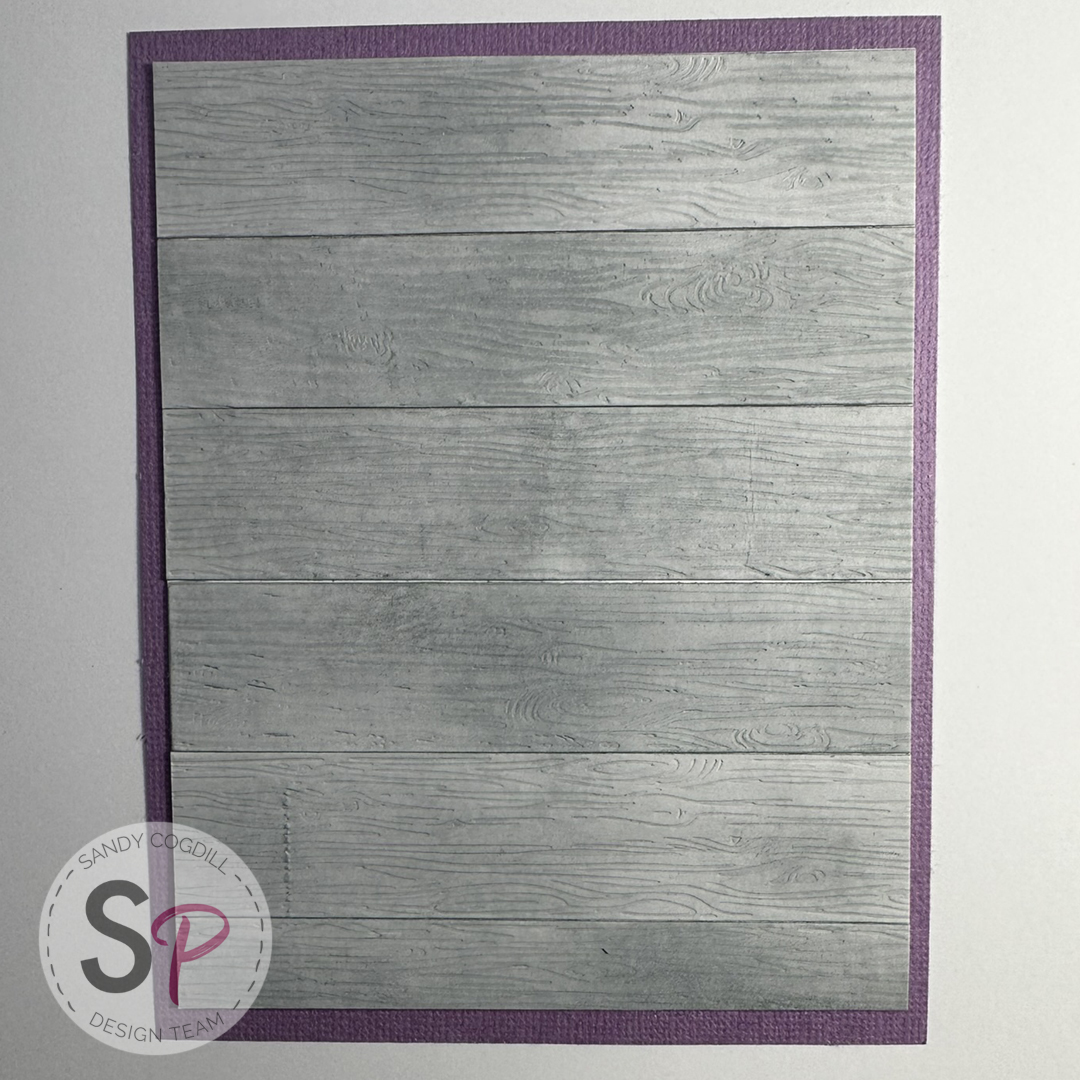
To create the background for the card, I used the Honey Bee Stamps,Barn
Wood Planks Die. I love this
set, not only does it cut but it also embosses.
I also like that it is planks rather than I full woodgrain
background. Each plank has its own
pattern. I cut my planks from a very
light gray cardstock. I added a little
bit of Weathered
Wood Distress Ink Oxide.
I glued six planks on a piece of white cardstock, using Bearly
Art Precision Craft Glue, that was cut to 4.25” x 5.5”. I trimmed it down to 4” x 5.35” and glued it
to a piece of lilac cardstock that had been cut to 4.00” x 5.25”.
Hello!!! This card was created for Craft Roulette Challenge #269. I had been wondering how the new Trinity Stamps and Sassy's LLC, Emergency Card #3 - Double Slider would work with a square card. I wanted to make one of the Gnomes from the Summer Gnome Fun Stamp Set and Coordinating Die Set, jump on the diving board from the Backyard Pool Stamp Set and Coordinating Die Set. I have used both of these sets multiple times - they just might be my favorites.
To start, I stamped the Backyard Pool on a piece of cardstock cut to 6" x 6". I masked off the all the area except the water in the pool and the sky in the background. I have used this mask multiple times, so it is a bit inked. I used the Puffy Cloud Layers Stencil with Tumbled Glass Distress Oxide Ink, to lay in some clouds.
To ink the water in the pool, I used the Cow Print Stencil with Tumbled Glass, Mermaid Lagoon and Peacock Feathers Distress Oxide Ink. To create the look of water movement, I just used the different colors of ink and different areas of the stencil.
Once I had both of the areas inked, I removed the mask and started to color in the background. For this back ground, I used Copic markers in the following colors:
E13,
E23, E57 - Fence
T0,
T2, T5 - Boulder
BG000,
BG01, BG45 - Diving Board
W1,
W3, W5 - Pool Bricks
G21,
YG63, YG67 - Grass & Bush
The next step is to start building the interactive element. I cut the background piece to 5.5" x 5.5", Using the smallest slit die, I lined it up over the diving board where I wanted my Gnome to jump up and down. Try to make sure this opening is perpendicular or straight with the sides - that helps with the placement of the actual mechanism. I had thought mine was straight but it was off a little bit. I will also use the enclosed die to cut a notch above the slit to give the recipient and area to grab on to the tab.
I cut the two tabs that extend above and below the card out of white paper and then inked them like the sky for the top on and the water for the bottom one.
I've cut some soft acetate from discarded packaging to just a smidge under 2.25" to wrap around the "H" piece that I have cut from white cardstock. I applied strong .25" double sided adhesive to the top of the acetate, wrapped it around the "H" making a loop. Don't wrap too tight but loose enough for it to move freely. I then applied the adhesive tape to top of the front of the "H" and the bottom on the back of the "H". Then I attached my tabs to the "H". The cloudy piece goes on the bottom tape strip and the water piece is attached to the top piece. I also adhered .25" foam tape to the sides of the "H".
I have built the piece that will move my Gnome up and down by folding the strip on the embossed lines and then gluing it together. Make sure to round those tabs because it help that piece slide up and down. I wrapped mine around some long metal tweezers that I have but you could use a pencil or paintbrush. I also apply strong double sided tape to the base of this piece.
Before I assemble everything, I needed to stamp the top tab with the "pull" direction from the Papercrafting Magic Stamp Set.
I inserted the tab piece through the slit with the protected paper removed from the adhesive tape on the back, and place it all the way to the bottom of the slit. Then I removed the tape from the foam pieces on the "H". Before I press it down, I needed to make sure that my top tab was even with the top of the card and "pull" is centered.
To finish up the background, I filled in all the open areas with two layers of foam tape after I put a single layer on the back sides of the "H". Once that was done, I applied another piece of cardstock cut to 5.5" x 5.5" to seal everything up. Now I had the front of the card ready to finish up. I am linking my YouTube Video at the bottom of this post if you want a more detailed description of the assembly.
I have stamped, colored and die cut the images from the Summer Gnome Fun and Gnomies Under The Sea with Copic Markers in the following colors:
B0000,
BG01, FBG2 -Blues
YR01,
YR07, YR18 - Oranges
RV10,
RV04, RV17 - Hot Pink
Y02,
Y08, Y17 - Yellow
E00,
E0 - Skin
C1,
C3, C5 - Beards & Hair
The sentiments are from the Summer Gnome Fun Stamp Set. I also used the Sunshine Die Set for another part of the sentiment.
I had my little bathing beauty Gnome left over from coloring, so I used her and another sentiment on the inside of the card.
As I mentioned at the beginning of this card, I submitted for the Craft Roulette Episode #269. The parameters were:
Project: Square Card
Element: Clouds
Colors: Butterfly/ies
Random: Tie
This was such a fun little card to make. I really like working with the Emergency Card #3 - Double Slider die. The Summer Gnomes have a very special place in my heart!!!
Thanks for stopping by and I hope that you have some fun summer adventures or at least some relaxing pool time!!!


.jpg)